How to Work a Sewing Machine
This post may contain affiliate links which could provide us a small commission for our work at no cost to you.
Read the full disclosure here.
Not all sewing machines are the same, but for the most part, you’ll find that all sewing machines work in the same general way. Most sewing machines will all have similar features that do the same job. When you know these different features and how to operate them, you will be able to quickly adapt from one sewing machine to another. Now, before you can jump around and get to sewing, you need to have a basic understanding of what you will expect to find in a sewing machine. That’s where this article comes into play. Today, we are going to go over the basics of how to operate a sewing machine. With these helpful tips, you should be able to operate a wide variety of sewing machines with at least a basic and functional understanding of how this machine works. Let’s get started.
The first thing you should do is to make sure your sewing machine is placed at a comfortable height and on a sturdy, steady table to avoid making unnecessary mistakes (sewing machine work space). At best, you should have a small work area carved out in your home where your sewing machine is housed for all your sewing projects. The last thing you want to do is have to move your sewing machine from location to location when you are working on projects. Because there are different parts of the sewing machine that you want to keep relatively stationary, you may end up losing them if you are constantly moving your machine around. With that being said, your first step is to find a safe place in your home that is out of reach from children so that you can set up your sewing machine and get to work whenever you need to.
Next, read your instruction manual so that you understand the different pieces of your sewing machine. Once you have a general understanding of how it works and what you need to expect, you will want to ensure the needle is secure according to the instructions. You will also notice a thumbscrew on the side which you can turn to secure the needle tightly into place. You can gently test out to see whether or not the needle is secured by ever so slightly pushing on the foot pedal and checking to see that your needle is correctly going up and down.
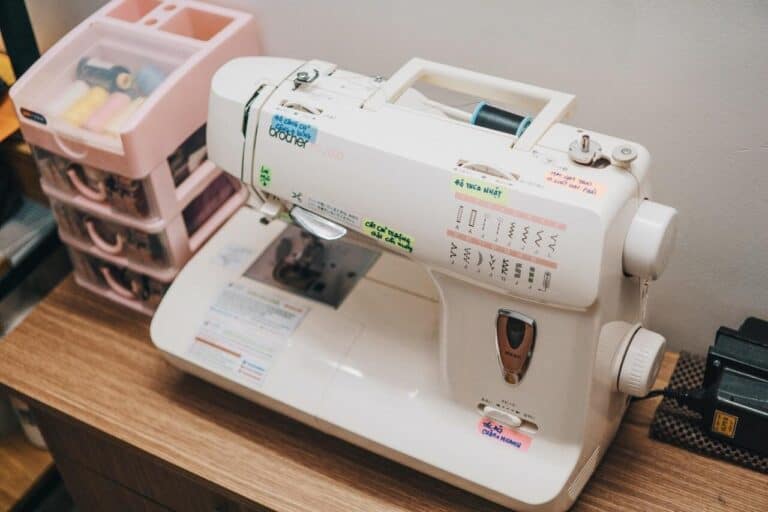
Sewing Machine Presser’s Foot :
If you have never worked a sewing machine before, no worries. You will find that operation is pretty straightforward and basic. With that being said, let’s get into the nitty-gritty now. Next, you will notice a metal ski-shaped plate, called the presser foot. Try raising and lowering this presser foot just to get a general feel for it before we get started (components of the sewing machine). This presser foot is where you will secure your fabric down so that you can get their perfect sew when you are working. This presser foot will also work as your guide when you are working.
Sewing Machine Bobbin and Thread :
Next, it’s time to wind the bobbin and insert the thread. There are a top and lower thread, so read your machine’s instruction manual carefully on how to do this correctly. For the most part, the different bobbins are relatively the same size but depending on the machine you are using, you may need a different size. The good news is that most sewing machines will almost always come with a bobbin that you can use. Now you will thread the sewing machine itself; each sewing machine varies, so once again refer to your manual. If you did not receive a manual or bought it second-hand, you can always refer to the internet by doing a Google search and entering your machine’s model number as most of these makes have their manuals online for your convenience as well.
Next, you’ll be raising the bobbin thread and ensure the thread is placed properly before actually turning the machine on. After turning the machine on, make sure the pedal is plugged in and switched on while being situated in a comfortable position under your feet. Your best bet is to start off by practicing on some old material you are not going to use just to get a feel for your machine before moving on to your new material. Avoid using the thick material because this can be quite difficult to sew.
When placing the two materials together to connect them, at the top, you’ll notice a hand wheel which is situated on the right side. Move this needle towards the top of the travel before you start a seam. Also, when you’re done remember to move the seam again while keeping the needle at the top of the travel.
The next step also depends on your machine, so consult your manual at home or online on how to work a sewing machine. The best setting is to select either a straight or medium stitch length before you continue sewing. Now you will line up the fabric carefully according to your sewing pattern diagram, press down on the presser foot and feel how it grips the fabric as you start tugging on the material. Hold both ends of the loose threads as you start sewing.
Use your foot pedal wisely as this controls your sewing speed, start off slowly and get comfortable first.
Once you master a basic sewing machine, you will be able to learn how to work a sewing machine, like more complicated models. For now, our handy tips and tricks should allow you to have just enough information to navigate even the most basic of sewing machines. Of course, with every sewing machine, you will come across there are differences and variations on how it is operated. Usually, when you read the instruction manual you will be able to gain a better insight that will allow you to work your sewing machine more effectively.